Jeep Galley Build
It has taken about two leisurely weeks to build Roscoe's galley so far. I'm basically finished with the big stuff and now just need to get a second coat of polyurethane on it and secure it down in the back of the Jeep.
What problem does this solve? No real problem, just one step toward a nicer way to car camp and explore and have fun while minimizing in-camp set up time.
This post is about the galley system I have built. It's not an original system...I have basically ripped off the ideas of several I have seen online and built my own to suit our needs. You can buy them if you want but they cost about $2500 and I say no to that, so I built one for $425. Sure, it's probably not going to last as long as a professionally built one, and it's a lot heavier, and the drawers will surely sag and bust prematurely and the entire unit will most likely become a deadly projectile in a high speed collision, but $1600 in savings and the satisfaction of a wood-working job done at a mid-level proficiency seems like a decent enough trade off for all that.
What we wanted in a galley system:
I drew up a basic plan but it was pretty vague of details since there were questions that I could only answer after a particular part of the build had been completed. I decided it would be better to do this as a design/build project.
Stage two: acquire materials.
Plywood, screws, drawer slides, etc.
Stage three: begin.
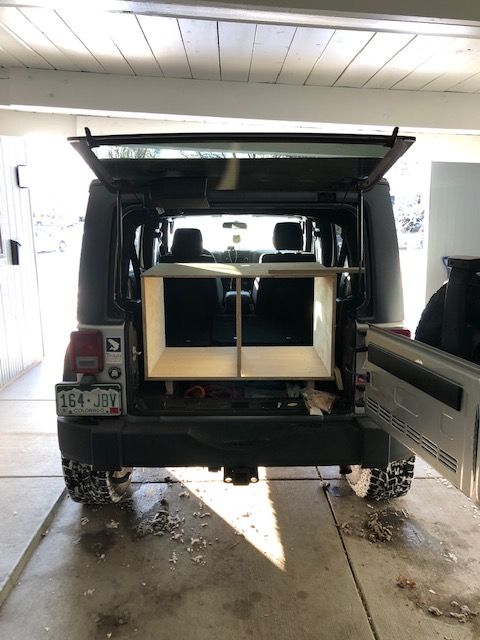
I assembled a basic box and put it in the back of Roscoe to determine if it was the right general size. In order to maximize rear view mirror visibility, I matched the height of the cabinet with the height of the rear seats. Pretty much. Note also that the box is raised on 2 x 4s to give access to the precious hidden space below and allow for extra storage space.
You can tell by the snow on the tires that it was pretty cold outside so I did most of the assembly in the living room of our house. Here is the cabinet getting glued and screwed together.

And here it is the next morning with the backing in place to keep everything nice and square and sturdy.

Next part was to build the sliding shelf for the cooler, on the left. That was followed by the stove within the work box, all on heavy duty drawer slides. The slides I used for the heavy lifting are from Rockler Woodworking. They are heavy duty, full extension, 220# drawer slides. I used 100# slides for the actual stove platform. Others builders have used the 500# locking slides for these parts but they are about $130 each (not for the pair!) which is out of the budget. I hope these will work.

Here is a latte that a barista made for me at work. He makes very realistic dick foams. Coffee is his canvas.

Construction is mostly finished here. I used slam latches for the drawer pulls which keep them from opening when I don't want them to. Ordered them from Amazon. For the drawer slides I used full extension models from the Home Despot. I still to need to find a solution to keep the cooler slide and the oven drawers from opening and closing when Roscoe lurches.

I kind of like the exposed screw and nail heads. I'm not going to try to cover them. The cabinet still needs sanding and cleaning up and a layer of polyurethane, but I'm pretty happy with it so far.


Everything fits and there are lots of nooks and crannies between the outsides of the cabinet and the insides of the Jeep where we can store all sorts of odds and ends and English muffins.
Next step: remove, cut some large holes in side and back areas to reduce weight by a few pounds, sand, clear coat, secure to Roscoe's tie downs and attach tie downs on the top of the cabinet to secure duffel bags while in transit.
Update a few days later:
I cut out a few non-structural holes to lighten the cabinet up a bit (total weight with all drawers and hardware is 93#--less than I guessed it would end up at, so that's good), then applied two coats of polyurethane. After the first coat dried and I got it sanded down, a cold front came through the area keeping temps below freezing for about a week. Frustrated by the delay I brought the cabinet and its components back into the living room from the freezing workshop after a short day at work and proceeded to apply the second and final coat.

The house reeked of chemicals but it has mostly dissipated in the past few hours. The neighbor dog is sleeping on the couch. She is my Australian Shepherd in the coal mine and doesn't seem brain damaged so I think we're okay. Happily, the polyurethane is mostly dry so I'll be able to transport it back out to the workshop this evening.
Next step: Install tie downs to top of cabinet and attach the cabinet to the back of the Jeep using an assortment of turnbuckles and hook bolts to secure it to Roscoe's trunkal tie downs.
Update a few days later:
After a final sanding, some drilling into the 2 x 4 base and lots of cussing, I got the cabinet installed.
I'll let the pictures do the work:


Still to do: create securing mechanisms for the cooler and grill shelves so they don't open and close while on the road; install tie downs on top of the cabinet; get some bungees for the top tie downs; acquire the cooler; road test. I imagine that I'll need to put some space filler in the drawers that are not packed tight with stuff or else everything will bounce around inside and create an awful racket. A few dish towels might do the trick.
A few days later:
Figured out how to secure the cooler, work box and stove shelf from banging around while moving by using quick-release ball detent pins in appropriately-sized drilled holes.

Next: My REI dividend came in so I drove down and picked up a Yeti Tundra 35. The entire left space of the galley was built around Yeti.com's published dimensions, so I was a little nervous that it would fit....more specifically, that the slider would come out enough to allow the cooler to fully open. All reservations were banished upon test fitting.
I did cut and place some L-brackets left over from the build to keep everything nice and snug. I attached some paracord to secure things down. (I might change that out for something else a little more professional-looking or streamlined eventually, but I really don't want to spend any more $ on this thing, so paracord and some nicely-tensioned truckers' hitches will do for now.)

On the stove side I spent about $5 on rubber grommets and Super Glued them where the stove legs go to keep things quiet and from sliding around. Tip: Gorilla glue won't hold.


And so it ends. Or I guess it's the end for one thing and start of another...specifically, using it. I still need to pack it all up and drive over some bumpy roads and see how things hold up. I'm sure after that I'll learn something terrible and have to go back and retro fit one thing or fortify another. Hopefully not, but that's usually how these things go.
Total cost for the build: $425. Time to build it: dunno. 40 hours or so--maybe--not including drying times for glue and polyurethaning and stuff. I'm sure it could be done in much less time than that. I took my time and tried to do it correctly. Time will tell if that was good enough.
I know I skipped over a lot of little things so if you want some more detail ask questions here and I'll try to fill in the blanks.
Cheers, and happy Jeeping!
What problem does this solve? No real problem, just one step toward a nicer way to car camp and explore and have fun while minimizing in-camp set up time.
This post is about the galley system I have built. It's not an original system...I have basically ripped off the ideas of several I have seen online and built my own to suit our needs. You can buy them if you want but they cost about $2500 and I say no to that, so I built one for $425. Sure, it's probably not going to last as long as a professionally built one, and it's a lot heavier, and the drawers will surely sag and bust prematurely and the entire unit will most likely become a deadly projectile in a high speed collision, but $1600 in savings and the satisfaction of a wood-working job done at a mid-level proficiency seems like a decent enough trade off for all that.
What we wanted in a galley system:
- A pull-out storage space for an efficient cooler
- A pull-out storage space for a camp stove
- A pull-out storage space for a cutting/work area that would house the camp stove
- A few large-capacity drawers
- A top area with tie downs to store our duffel bags
I drew up a basic plan but it was pretty vague of details since there were questions that I could only answer after a particular part of the build had been completed. I decided it would be better to do this as a design/build project.
Stage two: acquire materials.
Plywood, screws, drawer slides, etc.
Stage three: begin.
I assembled a basic box and put it in the back of Roscoe to determine if it was the right general size. In order to maximize rear view mirror visibility, I matched the height of the cabinet with the height of the rear seats. Pretty much. Note also that the box is raised on 2 x 4s to give access to the precious hidden space below and allow for extra storage space.

You can tell by the snow on the tires that it was pretty cold outside so I did most of the assembly in the living room of our house. Here is the cabinet getting glued and screwed together.

And here it is the next morning with the backing in place to keep everything nice and square and sturdy.

Next part was to build the sliding shelf for the cooler, on the left. That was followed by the stove within the work box, all on heavy duty drawer slides. The slides I used for the heavy lifting are from Rockler Woodworking. They are heavy duty, full extension, 220# drawer slides. I used 100# slides for the actual stove platform. Others builders have used the 500# locking slides for these parts but they are about $130 each (not for the pair!) which is out of the budget. I hope these will work.

Here is a latte that a barista made for me at work. He makes very realistic dick foams. Coffee is his canvas.

Construction is mostly finished here. I used slam latches for the drawer pulls which keep them from opening when I don't want them to. Ordered them from Amazon. For the drawer slides I used full extension models from the Home Despot. I still to need to find a solution to keep the cooler slide and the oven drawers from opening and closing when Roscoe lurches.

I kind of like the exposed screw and nail heads. I'm not going to try to cover them. The cabinet still needs sanding and cleaning up and a layer of polyurethane, but I'm pretty happy with it so far.


Everything fits and there are lots of nooks and crannies between the outsides of the cabinet and the insides of the Jeep where we can store all sorts of odds and ends and English muffins.
Next step: remove, cut some large holes in side and back areas to reduce weight by a few pounds, sand, clear coat, secure to Roscoe's tie downs and attach tie downs on the top of the cabinet to secure duffel bags while in transit.
Update a few days later:
I cut out a few non-structural holes to lighten the cabinet up a bit (total weight with all drawers and hardware is 93#--less than I guessed it would end up at, so that's good), then applied two coats of polyurethane. After the first coat dried and I got it sanded down, a cold front came through the area keeping temps below freezing for about a week. Frustrated by the delay I brought the cabinet and its components back into the living room from the freezing workshop after a short day at work and proceeded to apply the second and final coat.

 | |
| Stinkin' up the place |
The house reeked of chemicals but it has mostly dissipated in the past few hours. The neighbor dog is sleeping on the couch. She is my Australian Shepherd in the coal mine and doesn't seem brain damaged so I think we're okay. Happily, the polyurethane is mostly dry so I'll be able to transport it back out to the workshop this evening.
Next step: Install tie downs to top of cabinet and attach the cabinet to the back of the Jeep using an assortment of turnbuckles and hook bolts to secure it to Roscoe's trunkal tie downs.
Update a few days later:
After a final sanding, some drilling into the 2 x 4 base and lots of cussing, I got the cabinet installed.
I'll let the pictures do the work:
 |
| Looking down (toward the front of Jeep) the left 2 x 4 base, the rear of the cabinet is bolted through the wood to a tie-down using a thick bolt and washers on both sides of the wood |
 |
| Inside view of the connection point |
 |
| I used turnbuckles attached to hooks through the front 2 x 4. The turnbuckles allow me to tension the connection to minimize vibrations while underway. This picture has the rear seats laying down for visibility. Note: I left about six inches of space between the cabinet and the bottom of the rear seat so I'd have a place to stuff various items such as hammock, tarp, jugs of water, etc. |

 |
| The next few pics show the galley in various states of revealing itself. This galley is not shy. |

 |
| I think galley supplies (plates, knives, spices, can/wine openers, etc.) will go in the top drawer so as I'm working on the cutting board I can open that drawer without having to clear off the work area. I am so smrt. |
Still to do: create securing mechanisms for the cooler and grill shelves so they don't open and close while on the road; install tie downs on top of the cabinet; get some bungees for the top tie downs; acquire the cooler; road test. I imagine that I'll need to put some space filler in the drawers that are not packed tight with stuff or else everything will bounce around inside and create an awful racket. A few dish towels might do the trick.
 |
| Tie downs installed. To really secure things down I'll switch out the bungees for paracord, if necessary. |
A few days later:
Figured out how to secure the cooler, work box and stove shelf from banging around while moving by using quick-release ball detent pins in appropriately-sized drilled holes.

 |
| This keeps everything snug and quiet while driving |
 |
| This pin pokes in two places: one to keep it closed, one to keep it open |
Next: My REI dividend came in so I drove down and picked up a Yeti Tundra 35. The entire left space of the galley was built around Yeti.com's published dimensions, so I was a little nervous that it would fit....more specifically, that the slider would come out enough to allow the cooler to fully open. All reservations were banished upon test fitting.
I did cut and place some L-brackets left over from the build to keep everything nice and snug. I attached some paracord to secure things down. (I might change that out for something else a little more professional-looking or streamlined eventually, but I really don't want to spend any more $ on this thing, so paracord and some nicely-tensioned truckers' hitches will do for now.)

On the stove side I spent about $5 on rubber grommets and Super Glued them where the stove legs go to keep things quiet and from sliding around. Tip: Gorilla glue won't hold.


 |
| The finished product |
And so it ends. Or I guess it's the end for one thing and start of another...specifically, using it. I still need to pack it all up and drive over some bumpy roads and see how things hold up. I'm sure after that I'll learn something terrible and have to go back and retro fit one thing or fortify another. Hopefully not, but that's usually how these things go.
Total cost for the build: $425. Time to build it: dunno. 40 hours or so--maybe--not including drying times for glue and polyurethaning and stuff. I'm sure it could be done in much less time than that. I took my time and tried to do it correctly. Time will tell if that was good enough.
I know I skipped over a lot of little things so if you want some more detail ask questions here and I'll try to fill in the blanks.
Cheers, and happy Jeeping!
Nice work!
ReplyDelete